Minimal Raspberry Pi Google Cloud Print Server
OMG, it's been a year since I posted my last post. TBH, I have had a couple of drafts in 2015, but did not get time to complete anyone of them to be published.
So I was cleaning up my electronic junk, and believe me I order a lot of stuff online and then lose track of it. Back in 2014 I ordered a Raspberry Pi, model B and it just came out of a box lying under some other boxes. It's a wasted Rs. 2400.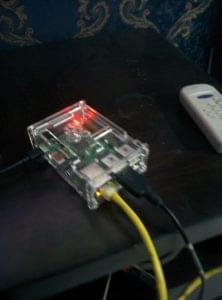
I had initially planned it to be my media server, but then I bought a chromecast and DLNA compatible NAS server. So this was pretty much out of the equation. Moreover RPi are slow for File/Media servers. So let's leave that for the solutions already available. I have an old deskjet 1050 AIO printer which is almost breathing it's last breath. It's really broken, with the outer body cracked and the I/O tray missing, but the thing still prints. So, if I were to buy a new printer then buying a Google Cloud Enabled printer would be a no brainer. But, it struck me, can I make this box online without much effort?

The following setup took me less than an hour to complete and everything seems to be up and running smooth.
- Download Distro: I lost track of the RPi world long ago, a quick search revealed that a distribution called minibian is available and the developer is quite active with this. Please consider donating him. Head over here to download the latest image. At the time of writing it is March 12th update.
- Writing Image: Just unzip the tar-gunzip package to get to the .img file and follow this guide here. Use this guide In case you're running linux, use this guide.
- SSH: My windows laptop ran out of battery so I continued the setup from here on my chromebook. I plugged the sdcard into the RPi, hooked it to a LAN cable from my wifi router, powered it on using a 5v 2amp charger. I had no idea about the lan address so a quick check into my wifi router's DHCP tables revealed that 192.168.0.51 had been assigned to my RPi, so a simple ssh into '[email protected]' with password 'raspberry' landed me the terminal with su access.
- Resizing the SD Card and setting up locales. Since, this is a minimal install, there is no GUI to do this, you might find steps to do this from terminal, but here is the easier way:
apt-get update; apt-get upgrade; apt-get install raspi-config; - Configure RPi: run raspi-config and you get the RPi GUI for expanding the SD card and setting internationalization options. Do that and reboot.
- Installing Nano: you can install an editor for quick editing files over ssh, nano works nice.apt-get install nano
- Cups Web Printing: Cups stands for common unix printing system. This should support all printers from all manufacturers. Check with your manufacturer if the provide linux drivers, like HP does in a package called hplip. Follow this excellant guide. You can leave the scanner part for now, just follow all steps under the heading 'Printing'.
- GCP Cups Connector: The folks at Google Cloud Print team has this great step by step guide to set the cups connector up and running in no time, however the code has bugs and it won't run directly. I filed this as an issue with the team.
- Creating a Google Group: head over to Google Groups to create a new group with your famil/friends with whom you would like to share the printer with, once done, get the groups email id. That would look something like [email protected]
- Correcting the GCP config: while running the init script, you can respond with any gmail id. When all the steps are complete, before moving this to /etc/gcp_cups_connector dir. run: nano ~/gcp-cups-connector.config.json change scope to the google group email id and continue with the guide from step 8.
- Setting up the service to start at boot: This guide has 3 methods to do this, we need the first one. Since you are already logged in as 'root', you do not need to use sudo, you can run them without sudo. Also ideally the command systemctl enable gcp should make this start every time the system starts, but this won't work as the network would be down at the start. So we need to make it retry till it finds the network. You can do nano /etc/systemd/system/gcp.service and make the file look like following (notice the restart and restart sec statements):
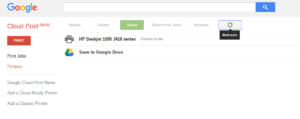
- Reboot and wait: since you're logged in as root, type reboot on the terminal and wait. Ideally, the printer would be listed here https://www.google.com/cloudprint/#printers now you can enjoy printing from your chromebook, phone or any machine connected to the internet.
Hope it was smooth, took me less than 45 mins to get this up and running. Finally this shows up:
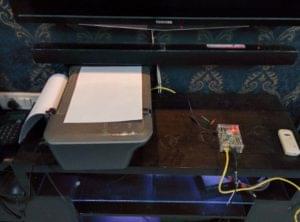
Messy Setup:
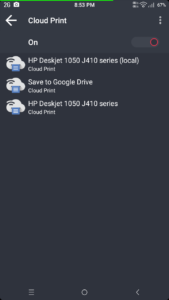
And on phone:
 Next up, I found a resistive touch screen for arduino in my stack, can I use this with raspberry pi to show the printer status on the screen?
Happy Hacking :)
Cheeers.